Laravel Middlewares
- Details
- By Prasit Gebsaap
- Hits: 2670

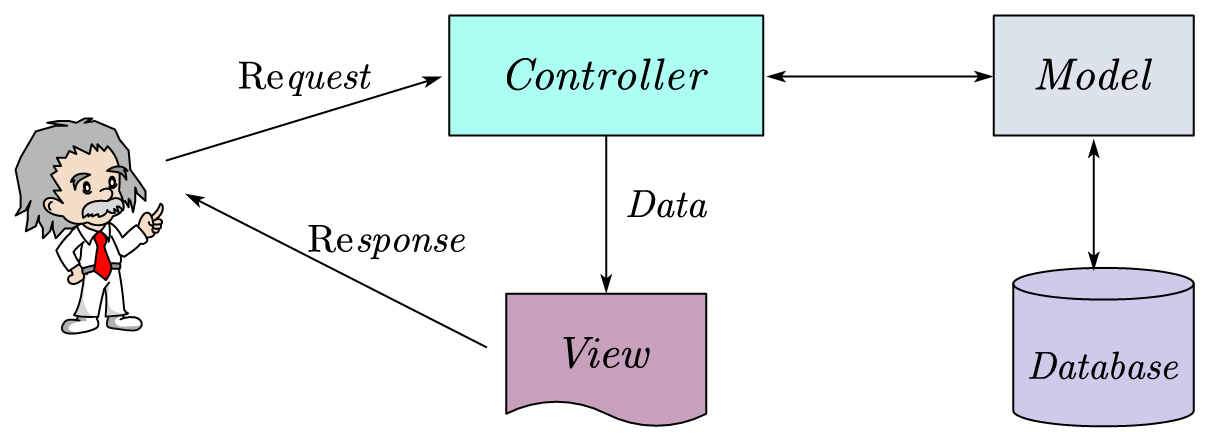
Middleware คืออะไรใน Laravel หน้าที่หลักของมันคือการทำหน้าที่ในการสอดส่อง แก้ไข กำหนดค่าต่างๆ ให้กับ Request โดยถูกออกแบบมาให้ทำงานแบบที่สามารถเพิ่มหรือลดโดยนักพัฒนาได้ มีด้วยกันสองแบบคือ Global Middlewares ทำงานกับทุก Request ที่เรียกเข้ามา ส่วนอีกกลุ่มหนึ่งก็ขึ้นอยู่กับว่าให้ทำงานกับอะไรอาจจะเป็น Routes หรือ Controller ก็ได้โดยใน Laravel 11 จะมีการเปลี่ยนวิธีการตั้งค่าของ Middleware ต่างออกไปจากรุ่นก่อนหน้านี้พอสมควรครับ
สำหรับผมซึ่งมาจากค่าย Joomla ก็พอจะบอกได้ว่ามันทำงานคล้ายๆ Plugin ใน Joomla นั่นแหละครับ เช่นอาจจะทำหน้าที่ในการตรวจสอบ Session หรือทำการ Redirect กรณีเรียกเข้ามายังหน้าที่มีการป้องกันก็ได้เช่นกัน
หน้าที่ของ Middlewares
สำหรับหน้าที่ของ Middlewares ก็ทำได้ทุกอย่างแหละ แล้วแต่แนวคิดของท่านเลย แต่ที่พอจะนึกออกน่าจะประมาณนีครับ
- ป้องกัน Routes ให้เป็นไปตามเงื่อนไข เช่นต้อง Login หรือ ต้องยืนยัน E-mail แล้ว
- กำหนด Headers ที่ต้องการใน Response
- เก็บประวัติการใช้งาน หรือ Logging
- ตรวจสอบ Input Parameters ในส่วนของ Request
- เปลี่ยนแปลง Response ที่ส่งกลับมาจาก Application ก่อนส่งให้ผู้ใช้
- การเปลี่ยน Database Connection สำหรับ Multi-tenancy Application
การสร้าง Middlewares
การสร้าง Middleware จะมี Artisan Command รองรับครับ
php artisan make:middleware <name>โดยเปลี่ยนตรง name เป็นไฟล์ หรือ คลาสที่ต้องการสร้าง Laravel จะสร้างไว้ให้เราใน app\Http\Middlewares ครับ
<?php

namespace App\Http\Middleware;

use Closure;
use Illuminate\Http\Request;
use Symfony\Component\HttpFoundation\Response;

class EnsureTokenIsValid
{
    /**
     * Handle an incoming request.
     *
     * @param  \Closure(\Illuminate\Http\Request): (\Symfony\Component\HttpFoundation\Response)  $next
     */
    public function handle(Request $request, Closure $next): Response
    {
        if ($request->input('token') !== 'my-secret-token') {
            return redirect('home');
        }

        return $next($request);
    }
}
สำหรับตัวอย่างด้านบนเราเรียกว่าเป็น Before Middleware ครับจะทำงานก่อนที่ Controller จะถูกเรียกใช้งาน โดยในตัวอย่างจะเป็นการตรวจสอบว่ามี token เท่ากับ my-secret-token หรือไม่ถ้าไม่มีก็ให้ทำการ Redirect ไปหน้า Home โดยโครงสร้างของ Before Middleware จะเป็นตามโค้ดด้านล่างครับ
<?php

namespace App\Http\Middleware;

use Closure;
use Illuminate\Http\Request;
use Symfony\Component\HttpFoundation\Response;

class BeforeMiddleware
{
    public function handle(Request $request, Closure $next): Response
    {
        // Perform action

        return $next($request);
    }
}
แน่นอนว่าเมื่อมี Before Middlewares ก็ต้องมี After Middlewares ที่ทำงานภายหลังที่ Application มีการสร้าง Response สำหรับส่งกลับให้ผู้ใช้ ดังนี้
<?php

namespace App\Http\Middleware;

use Closure;
use Illuminate\Http\Request;
use Symfony\Component\HttpFoundation\Response;

class AfterMiddleware
{
    public function handle(Request $request, Closure $next): Response
    {
        $response = $next($request);

        // Perform action

        return $response;
    }
}
นอกจากนี้ก็ยังมี Middleware ที่ทำงานหลังจาก Response ถูกส่งออกไปแล้วด้วย มันคือ Terminable Middleware มีรูปแบบดังนี้
<?php

namespace Illuminate\Session\Middleware;

use Closure;
use Illuminate\Http\Request;
use Symfony\Component\HttpFoundation\Response;

class TerminatingMiddleware
{
    /**
     * Handle an incoming request.
     *
     * @param  \Closure(\Illuminate\Http\Request): (\Symfony\Component\HttpFoundation\Response)  $next
     */
    public function handle(Request $request, Closure $next): Response
    {
        return $next($request);
    }

    /**
     * Handle tasks after the response has been sent to the browser.
     */
    public function terminate(Request $request, Response $response): void
    {
        // ...
    }
}
หลังจากทำการสร้างตัว Middleware แล้วต้องทำการเพิ่มเข้าไปเป็น Global Middleware ด้วยนะครับ โดยปกติ Laravel จะทำการสร้าง Terminable Middleware ขึ้นใหม่ แต่ถ้าเราต้องการให้มันใช้ตัวเดิมทั้งการ Handle Request ก็กำหนดใน AppServiceProvider ได้ ดังนี้
use App\Http\Middleware\TerminatingMiddleware;

/**
 * Register any application services.
 */
public function register(): void
{
    $this->app->singleton(TerminatingMiddleware::class);
}
การลงทะเบียนหรือติดตั้ง Middlewares
หลังจากสร้างไฟล์ Middleware แล้ว เราต้องทำการลงทะเบียนมันไว้กับ Laravel Application ด้วยนะครับ โดยใน Laravel 11 จะมีการเปลี่ยนโคร้งสร้าง Application ดังนั้นตำแหน่งการตั้งค้าของ Middlewares จะต่างออกไปจากรุ่นก่อนหน้า แต่หลักการโดยรวมยังคงเดิมครับ มาดู \bootstrap\app.php กันก่อนครับ
<?php

use Illuminate\Foundation\Application;
use Illuminate\Foundation\Configuration\Exceptions;
use Illuminate\Foundation\Configuration\Middleware;

return Application::configure(basePath: dirname(__DIR__))
    ->withRouting(
        web: __DIR__.'/../routes/web.php',
        commands: __DIR__.'/../routes/console.php',
        health: '/up',
    )
    ->withMiddleware(function (Middleware $middleware) {
        //
    })
    ->withExceptions(function (Exceptions $exceptions) {
        //
    })->create();
จะเห็นได้ว่าการโหลด Routes ที่เคยอยู่ใน Application Service Provider ก็ย้ายมาอยู่ที่นี่การลงทะเบียน Middleware ที่เคยอยู่ใน app\Http\Kernel ก็ย้ายมาอยู่ที่นี่ครับ ตัว Service Provider ก็จะถูกเพิ่มเข้าไปในไฟล์ \bootstrap\providers.php ซึ่ง Providers เก็บที่เดิม แต่ตอนติดตั้งใหม่ๆ มันมีแค่ ApplicationServiceProvider ตัวเดียว แล้วก็เป็นโค้ดว่างๆ เลย
การเพิ่ม Global Middleware ใน Laravel 11 ก็ทำตามโค้ดด้านล่างเลยครับ
use App\Http\Middleware\EnsureTokenIsValid;

->withMiddleware(function (Middleware $middleware) {
     $middleware->append(EnsureTokenIsValid::class);
})
ตัวอย่างการใช้ append(...) ก็เป็นการเพิ่ม Middleware เข้าไปในส่วนท้าย ถ้าอยากให้อยู่ต้นรายการก็ใช้ prepend(...) ครับ แต่ถ้าอยากจัดการทั้งรายการของ Global Middleware ก็ทำการกำหนดผ่าน use(...) แล้วกำหนด array ของ Middlewares เข้าไปครับผม
สำหรับการกำหนด Middlewares ให้ทำงานกับ Routes ยังไม่เปลี่ยนนะครับ
Route::get('/', function () {
    // กำหนด routes ที่นี่่
})->middleware([First::class, Second::class]);
ส่วนการตั้งชื่อ alias ก็ยังมีเหมือนเดิมครับ ทำที่นี่เช่นเดียวกัน


ล่าสุดใน Web Board
- No posts to display.